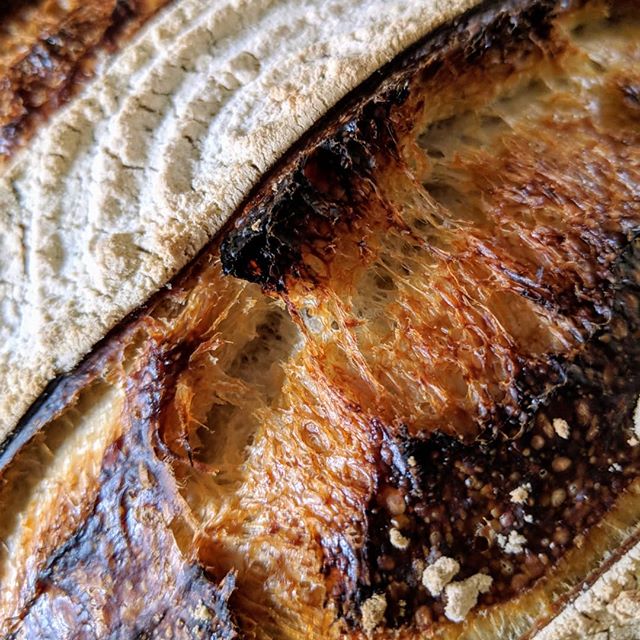

The January 2011 Daring Bakers’ challenge was hosted by Astheroshe of the blog accro. She chose to challenge everyone to make a Biscuit Joconde Imprime to wrap around an Entremets dessert.
Right, so what do all those fancy French words actually mean? Quite simply, a layered dessert, normally of various mousse, Bavarian creams, pastry creams, sponge cake or whatever else you fancy. All beautifully presented in a neat little package that's wrapped in a patterned strip of sponge.

Pear mousse & almond cake entreme
To quote our DB challenger:
A joconde imprime (French Baking term) is a decorative design baked into a light sponge cake providing an elegant finish to desserts/torts/entremets formed in ring moulds. A joconde batter is used because it bakes into a moist, flexible cake. The cake batter may be tinted or marbelized for a further decorative effect.
Entremets (French baking term) is an ornate dessert with many different layers of cake and pastry creams in a mould, usually served cold.
Simple, no? Sort of. As with any DB challenge, we're given certain leeway here and there and this challenge had a whopper of choice. You must make the jaconde imprime, but you can fill it with anything you like. Anything. Pudding, mousse, creams, heck, put M&M's in there if you like. You can also choose any flavours that your heart desires.
Which sounds fantastic until you actually try to decide on which flavour and texture combination you'd like. Chocolate? Vanilla? Fruit of some kind? Mocha? All mousse? Pastry cream & mousse? It gets a little overwhelming!

Ripe pears waiting their tasty fate
But I absolutely love a challenge like this, the variety of creative ideas that pour forth from my fellow Daring Bakers are just incredible. All through the month new variations were being posted on the forum making you go "Oh, why didn't I think of that?" It really is so much fun to see all the different flavours and textures and colours.

I decided on doing a pear mousse. Why? It was just one of those things. Whenever we went for the weekly grocery shopping I would always look at these odd pears, called Ya pear, or White Asian pear. All ghostly white and a little bit round. I was fascinated with them but never put them in the trolley.
Maybe I liked the look of them 'cause they appeared to be the nerds of the fruit world. All pale like it had a hacker's tan from too much time in front of a monitor and not enough time out in the world where the sun could give it some colour.
Whatever the reason, they'd been fascinating me for months. Then the challenge arrived. And the first idea that grabbed my attention had the word "pear" in it.

Pear puree
So I bought some Ya pears to try. Alas, they were not ideal for a mousse. Firstly, what an odd texture! I believe they're a cross between a pear & an apple, and so they have a crisp and crunchy bite to them, just like an apple. They're also not very sweet and have a very high water content. Each bite had pear juice dripping. Although a fun eating experience, not ideal for my pear mousse.
So I went with the normal old pear that tastes like a pear, looks like a pear, smells like a pear etc etc. Why did I tell you about the Ya pear? I dunno, I just thought I'd share my fascination with this strange fruit.
I found a pear mousse recipe online, so I was set. Then to figure out the other stuff.

The moistest and most delicious almond cake
I didn't want to get too complicated and do five different layers which would take up too much time. This is when brain associations come in handy! My brain association to pear was almond. I wanted a different texture to the mousse so I thought a sponge would be nice.
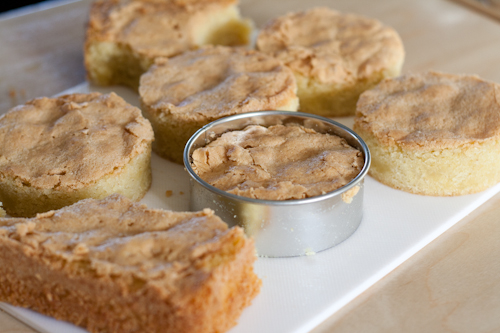
Cutting rounds of almond cake with pastry cutters
I'm so very very very very very glad that I had this thought 'cause I found the most incredible pear sponge cake recipe. I would say that this discovery even makes my always beloved carrot cake's position as 1st on my list look a little as if it might be taken over by this newcomer. Oh how I yearn to have more almond cake! How I wish I could give a kiss to its maker, who, by the way, is the ever favourite David Lebovitz. It's a recipe that he's adapted and been kind enough to share.

nomnomnomnom....
I'm not going to get into too much detail about it 'cause I plan on doing a post dedicated to it and its awesomeness. Just know that it's one you HAVE to try yourself. It's moist and sweet, needs no adornments or frosting, is gorgeously almondy with a great texture and just down right eat-the-whole-thing-in-one-sitting delicious.
Nuff said.
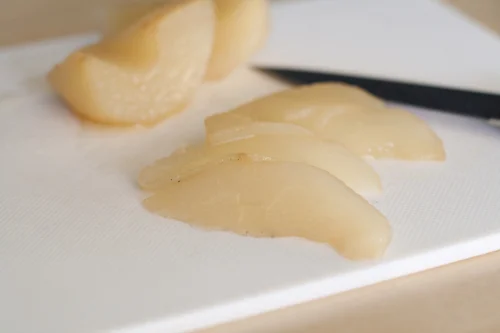
Poached pears spiced with vanilla and cinnamon
Next, I decided that a simple garnish would be nice. Poached pears fit the bill.
I decided to put a pear gelée layer as a last minute thought and am glad that I did, although I have yet to figure out why it went all dark and caramel in colour. This only happened after I had strained out the pear flesh to get the juice. Think next time I'd "cheat" and buy a carton of pear juice and just add gelatine to that instead. I was hoping for a more pale and milky colour. Oh well. The contrast kinda worked with the pale colour of the poached pear resting on top of it.

Jaconde decor paste
Finally, the jaconde impreme! It's actually quite easy to do, although I'm sure that mine have plenty of room for improvement. The pictures I've seen of professionaly made ones look far more flawless, no big bubbles anywhere, just a lovely smooth texture that makes you wonder how on earth it's actually made.

Baked biscuit jaconde
I was hoping for much finer detail but the pastry comb that I have is more for bold impressions on the side of a cake so I ended up with thick lines instead of the lovely delicate ones I would have preferred. A couple days after I had finished the challenge I came across what would have been a brilliant pastry comb. It is in fact a real comb, one for detangling wet hair. The teeth were spaced about 3mm apart and the teeth themselves were about 2-3mm each. Ah well, next time.

Cut into strips and ready for the food ring
The jaconde impreme doesn't have any distinct flavour which I would guess is the point of it so that you can match it up to any flavour combination and it won't get in the way. I found the texture to be the mix of a crépe and a pancake. Very flexible and almost rubbery. I had left an offcut on my counter overnight and the next day, although the edges were dry, it was still very flexible and I could almost fold in right onto itself before it started to break. Pretty cool!
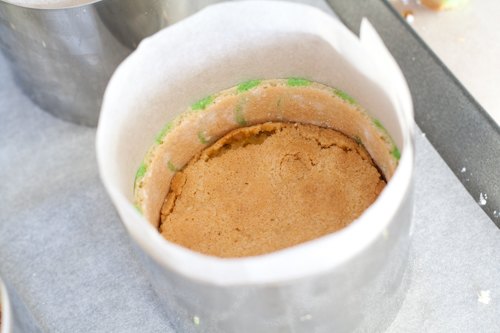
Lined with biscuit jaconde and the almond cake waiting for the mousse
One last thing, never again will I line a food mould with the intention of putting mousse inside with parchment paper. Never again. The parchment paper crinkled with the moisture and so left its ugly crinkly marks on my mousse and gelée layers. Why oh why didn't I get acitate?! I just wasn't thinking. Anyway, just so you know, I have in fact doctored the photos to try smooth out those layers 'cause I just couldn't bear to leave them wrinkled and pruney. I like to be honest about these things.

So, finally, here are the recipes and instructions for this intricate and intriguing dessert. Plenty of tips and other suggestions are at the end of the post.
I made 4x 9cm across 7.5cm high individual entremes and to be honest, they were just too big for one person to eat, so 6 smaller ones would have been a better portion size.
My recommended order that you should prepare this:
- Poach pears
- Bake almond cake
- Make Jaconde Decor paste, make patterns & freeze
- Make Jaconde sponge
- Bake biscuit jaconde impreme and line food rings
- Prepare pear mousse and fill mould, let set
- Make pear gelee and top entreme then let set
- Decorate with slices of poached pear & serve when ready
Patterned Joconde-Décor Paste
YIELD: Two ½ size sheet pans or a 13” x 18” (33 x 46 cm) jelly roll pan
(I made half of this recipe and had plenty of paste left over)
Ingredients
14 tablespoons/ 210ml/ 7oz/ 200g Unsalted Butter, softened
1½ cups plus 1½ tablespoons/ 385ml/ 7oz/ 200g Confectioners' (icing) Sugar
7 large Egg Whites (about 7 oz / 200g)
1¾ cup/ 420ml/ 7¾ oz/ 220g Cake Flour
Food coloring gel, paste or liquid
COCOA Décor Paste Variation: Reduce cake flour to 6 oz / 170g. Add 2 oz/ 60 g cocoa powder. Sift the flour and cocoa powder together before adding to creamed mixture.
Directions
- Cream butter and sugar until light and fluffy (use stand mixer with blade, hand held mixer, or by hand)
- Gradually add egg whites. Beat continuously
- Fold in sifted flour
- Tint batter with colouring to desired colour if not making cocoa variation
Preparing the Joconde- How to make the pattern:
- Spread a thin even layer of décor paste approximately 1/4 inch (5mm) thick onto silicon baking mat with a spatula, or flat knife
- Tip: You can also do this on parchment paper if you don't have a silicon baking mat
- Place mat on an upside down baking sheet
- Tip: The upside down sheet makes spreading easier with no lip from the pan
- Pattern the décor paste
- Tip: Here is where you can be creative. Make horizontal /vertical lines (you can use a knife, spatula, cake/pastry comb). Squiggles with your fingers, zig zags, wood grains. Be creative whatever you have at home to make a design can be used
- OR use a piping bag. Pipe letters, or polka dots, or a piped design. If you do not have a piping bag. Fill a ziplock bag and snip off corner for a homemade version of one
- Slide the baking sheet with paste into the freezer. Freeze hard. Approx 15 minutes.
- Prepare Jaconde sponge
Joconde Sponge
YIELD: Two ½ size sheet pans or a 13” x 18” (33 x 46 cm) jelly roll pan
(I made the whole recipe and again had plenty left over. I would also only make this AFTER you've put your patterned paste waiting in the freezer 'cause beaten egg whites don't like to sit around)
Ingredients
¾ cup/ 180 ml/ 3oz/ 85g Almond Flour/Meal - *You can also use hazelnut flour, just omit the butter
½ cup plus 2 tablespoons/ 150 ml/ 2⅔ oz/ 75g Confectioners' (icing) Sugar
¼ cup/ 60 ml/ 1 oz/ 25g Cake Flour
3 large Eggs (about 5⅓ oz/ 150g)
3 large Egg Whites (about 3 oz/ 90g)
2½ teaspoons/ 12½ ml/ ⅓ oz/ 10g White Granulated Sugar or Superfine (caster) Sugar
2 tablespoons/ 30 ml/ 1oz / 30g Unsalted Butter, melted
Directions
- In a clean mixing bowl whip the egg whites and white granulated sugar to firm, glossy peeks. Reserve in a separate clean bowl to use later
- Sift almond flour, confectioner’s sugar, cake flour in a separate bowl
- On medium speed, add the eggs a little at a time. Mix well after each addition
- Mix until smooth and light. (If using a stand mixer use blade attachment. If hand held a whisk attachment is fine, or by hand.)
- Fold in one third reserved whipped egg whites to almond mixture to lighten the batter
- Fold in remaining whipped egg whites. Do not over mix
- Fold in melted butter
- Remove hardened jaconde paste from freezer
- Quickly pour the Joconde batter over the design. Spread evenly to completely cover the pattern of the Décor paste
- Bake at 475ºF /250ºC until the joconde bounces back when slightly pressed, approx. 7-15 minutes
- Tip: You can bake it as is on the upside down pan. Yes, it is a very quick bake, so watch carefully.
- Tip: The outer edges will most likely brown and be crispy, don't worry about the edges as you will be trimming them away, you need to make sure that the middle of the sponge is baked through
- Cool
- Tip: Do not leave too long, or you will have difficulty removing it from mat
- Flip cooled cake on to a powdered sugared parchment paper
- Remove silpat
- Cake should be right side up, and pattern showing!
- Tip: The powdered sugar helps the cake from sticking when cutting
- Cut biscuit jaconde impreme into required length and height
- Tip: Get the circumference by wrapping a strip of parchment or greaseproof paper around the food ring and marking off where the ends meet then use this for the length of the jaconde strip
- Tip: Cut the biscuit jaconde impreme strips slightly longer than needed then trim to fit snuggly
- Assemble entremet
Almond cake recipe from David Lebovitz
I baked mine in a 25cm x 25cm / 10" x 10" square baking tin and got 5x 7.5cm circles (and thoroughly enjoyed munching on the offcuts!!)
Poached pears also from David Lebovitz
I topped each entreme with 1/4 of a poached pear
Pear Mousse
Ingredients
375g Peeled & Cored Ripe Pears
50g Caster Sugar
1/2tsp Lemon Juice
3 sheets Leaf Gelatine
300ml Double Cream
Pinch of Salt
Method
- Roughly chop the pear flesh and put into a pan along with the sugar, lemon juice and salt
- Cover with a lid and bring to boil
- Reduce the heat and simmer till the pears are soft, then remove from heat
- Soak the gelatine in cold water till soft. Squeeze out the water
- Add the gelatine to the pears and, using a hand blender or food processor, blend until smooth
- Allow to cool to room temperature
- Lightly whip the cream and fold into the pear mixture
- Divide among prepared food rings
Pear Gelee
Ingredients
1 tsp Powdered Gelatine
1 Tbsp Water
200g Ripe Pear Flesh
2 Tbsp Sugar (or to taste)
Splash of Lemon Juice
Method
- Sprinkle the gelatine over the water and put aside
- Process the pear with the lemon juice and the sugar until completely smooth
- Heat the mixture in a small saucepan over medium heat until it starts to bubble
- Add the gelatin and stir until it is completely dissolved
- Remove from the heat and cool till room temperature
- Pour over the pear mousse in the food moulds and refrigerate to set
Entreme Assembly
- Line food rings with acetate and place on a baking sheet lined with parchment paper
- Line the inside of the food ring with the biscuit jaconde
- Cut out circles of the almond cake with a pastry cutter that fits the inside of the biscuit jaconde
- Carefully push almond cake rounds into the food rings to make the bottom layer
- Tip: Make sure your biscuit jaconde is taller than the almond cake so that it sticks to the mousse layer, otherwise, if wanting the height of the biscuit jaconde to be the same as the almond cake layer, first brush the inside of the biscuit jaconde with smooth apricot jam so that the biscuit jaconde sticks to the almond cake layer
- Evenly divide the pear mousse among the food rings and smooth the tops
- Leave to set in the fridge for about an hour
- Divide the pear gelee among the food rings and leave to set in the fridge, about an hour
- Decorate with slices of poached pear
- Serve when ready

Thanks to our January '11 host for this great challenge. I would definitely do this one again :)
Pear Mousse recipe adapted from the Good Food Channel
Other Tips
Traditionally, the jaconde impreme should only come between 1/3 to 1/2 way up the side of the entreme so that you can see a layer of mousse or a few other layers of various fillings etc