For some reason I've never really been a fan of cheesecake. I think it goes back to trying it as a kid and just not enjoying it which has carried forward. Cheesecake lovers might think I'm crazy, and maybe I am, I'm not a huge fan of chocolate either. I mean, I won't pass up a slice of chocolate cake or dessert, but I don't really crave the stuff, I'd much rather have something with vanilla or caramel. Each to their own, I guess.
But with all that aside, I'd been looking to make a cheesecake for quite a while, I always enjoy trying something new & this seemed like a good challenge. Also, my hubby enjoys cheesecake as well as a lot of our friends, so I thought it would be good to know how to make this classic, just because I'm not ready to dive into a slice, doesn't mean others share my taste.
When I decide to put a recipe up it's normally something I'm confident about making, I still do a lot of research; I Google like crazy, go through my recipe books and my mom's old ones too, until I come up with something that I think will work. Sometimes it works first time round, sometimes I have to make slight adjustments. In the case of this cheesecake I'm lucky enough to have gotten this recipe right first time, yay for me! My husband thought it was really good and I'll admit, even I was looking forward to having another slice! (Maybe there's a cheesecake lover in me yet :) )
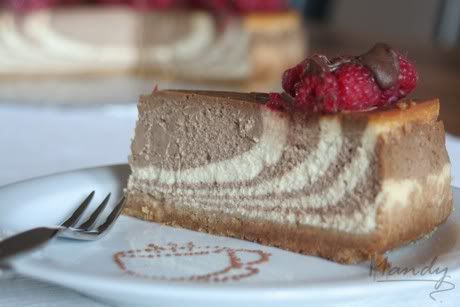
First, I decided on using a basic New York style cheesecake (a friend had mentioned this as their favourite) then I decided that if I'm doing something new, I might as well go all out and try make it a little more interesting than just a plain cheesecake. I've recently discovered the fun Zebra Cake and had made one (although I haven't posted it yet because it was one of those things that didn't work out the way I'd have liked because I got too clever with it ;) ) and seeing a lot of different cheesecakes with polka dots and marbling, it looked like the right thing to hold this interesting pattern. After more searches, it was confirmed that you can definitely use the zebra cake method with a cheesecake rather successfully. At this point I was really looking forward to making my first cheesecake!
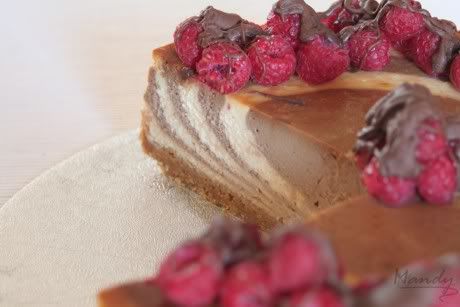
Then I had to decide on the flavours. There are so many cheesecake varieties that it sent my brain into a never ending spiral of "Strawberry? Chocolate? Raspberry?! Lemon?!?! No wait, strawberry! Nononono, lemon!!!! I don't know which one!!!!!" So after taking a few deep breaths I decided to make it something that I really enjoy, and oh how do I love coffee flavoured cakes and ice-creams and milkshakes and more! Vanilla seemed the logical flavour for the other colour, and in the end, I expanded it a little bit and the final decision was a Mocha & Vanilla Bean Baked New York Style Cheesecake.
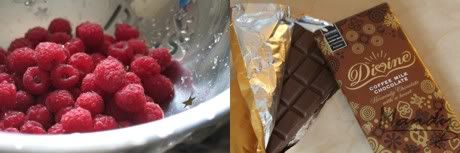
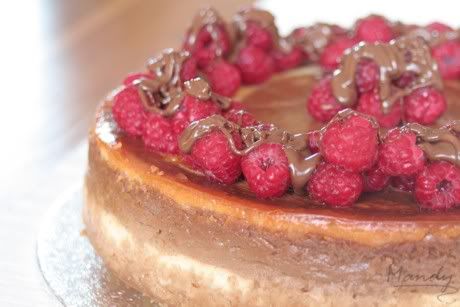
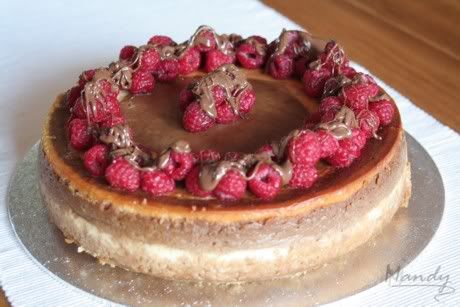
To add a little bit of colour and to have something to tame the richness of the cake but still go well with the flavours, I chose to use fresh raspberries as the garnish, and while at the grocery store, I came across a divine slab of coffee milk chocolate (no really, it's called Divine!). What a perfect way to tie it all together.

I must say, as out of my depth as I felt when I started looking through hundreds of recipes and seeing all the common problems a lot of people have with baking a cheesecake like cracking and dryness etc, I felt it was actually a very easy cake to make. I put it largely to all the tips and hints I found while doing my homework on baking a cheesecake, and so, if this is your first try, I hope that all the things I learnt about making a cheesecake successfully helps with your success too.
Ingredients:
Crust
200g Digestive Biscuits
¼ cup Brown Sugar
115g Unsalted Butter
Filling
4x 225g (8oz) Full Fat Cream Cheese (Room Temperature)
4 Eggs (Room Temperature)
1¼ cups Sugar
1 cup Double Cream (Room Temperature)
1 Tbsp Lemon Juice
1 tsp Vanilla Extract
1 Vanilla Bean
1 Tbsp Instant Coffee (powder)
2 tsp Cocoa Powder
½ tsp Salt
Raspberries (or other garnish of choice)
Method:
- Preheat oven to 165°C (145°C Fan Forced)
- Bring enough water to the boil to fill a larger dish for the waterbath
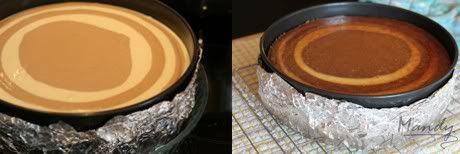
- Carefully butter a 9" springform pan all the way to the top
- Wrap the bottom of the pan with 2 layers of tinfoil to make sure no water seeps in. The foil should be at least 2" high up the sides of the tin.
- Line the bottom with wax paper (this will make it easier to slide the cake onto your serving dish)
Prepare the crust
- Blend the digestive biscuits to a fine crumb
- Melt the butter & combine with the sugar and biscuit crumbs until well mixed
- Press the crumb mixture into the bottom of the prepared pan
Prepare the filling
- With mixer at low speed, cream the cheese until smooth
- Add the sugar and mix until combined
- With mixer still at low speed, add eggs one at a time, mixing thoroughly before adding the next. Make sure to scrape the sides of the bowl between adding each egg
- Add the double cream, vanilla extract, lemon juice & salt, mix until well combined and smooth
- Pour half the mixture into another bowl
- Scrape the seeds out of the vanilla bean. Stir seeds into the one mixture, set aside
- From the other bowl, remove about a cup of the mixture & add the cocoa & coffee to it. Stir well to dissolve & add the mocha mixture back to the bowl & mix together thoroughly (if using coffee granules, first dissolve in a very small amount of warm water, about a teaspoon or 2)
- The 2 mixtures will be poured into the pan a cup at a time to create the "zebra" design (use seperate cups for each batter)
- Tip: (After my zebra cake disaster ;) ) I chose to go with a cup of batter for each layer to be safe, but you could probably make the layers thinner if you wanted by using less batter for each layer but creating more rings
- Pour 1 cup of the vanilla bean mixture into the centre of the pan (it will spread by itself as you add more of the mixture)
- Pour 1 cup of the mocha mixture directly into the center of the vanilla mixture
- Repeat these 2 steps, alternating the colours, until all of the batter has been poured into the pan (you should get about 8 zebra stripes in total)
- Tip: You can start with either colour, just make sure you alternate the colours
- Carefully place the springform pan into a larger pan or dish and place in the preheated oven
- Pour enough hot water into the larger pan to come to about 1½" up the sides of the cheesecake pan
- Bake for about 1h15 to 1hr30 until it is almost done (the cake should be firm around the outside but still have a lot of jiggle to the centre when you gently shake the pan)
- Turn the oven off & leave the cheesecake in the oven with the door shut for about an hour (the cheesecake will carry on cooking in this time and firm up until it's baked through. Also, as it gently cools down in the oven, it will help prevent the top from cracking.)
- Remove the cake from the oven & carefully lift it out of the waterbath. Let it finish cooling on the countertop
- Once cooled, put it in the fridge to chill
- Allow to chill in the fridge for a few hours, preferably overnight so that the flavours develop
- Remove from the springform pan, garnish & serve!
- Tip: To get clean slices, heat your knife up in a glass of boilt water, wipe dry then cut. Clean and reheat knife for each cut
Sources:
I searched through a lot of sites but this recipe was adapted from the following :) :
Tips:
Overmixing causes cracking: Unlike a sponge cake, you want as little air to incorporate into the cheesecake batter as possible, mix at a low speed or mix by hand when possible and mix just enough to combine ingredients
Dryness causes cracking: Using a waterbath to bake your cheesecake in will also help prevent it from cracking (If you don't have a large enough pan which will hold a lot of water, (like me ;) ) what I did worked fine, I placed my cheesecake pan in a larger pie dish and filled it with water but I had to top it up with hot water halfway through baking, also to be safe, I put an extra dish on the bottom of my oven also filled with hot water)
Sticking to the pan can cause cracking: After baking & before letting the cheesecake rest in the cooling oven, carefully run a knife around the edges to unstick it from the pan to prevent the top from cracking as it cools and shrinks slightly
I've found there are 2 temperatures that cheesecake is baked at: 180°C (160°C Fan Forced) for 45min - 1 hour & then 165°C (145°C Fan Forced) for 1hr15 - 1hr30. I used the lower temperature & longer cooking time which worked well but, judging on the amount of recipes that use the higher temperature, baking for shorter time at a higher temperature is also fine, just don't overbake, remember your cake should still have a good jiggle to the centre after baking, and once resting in the cooling oven, will bake through