This month was a little different for me with regards to the Daring Baker challenge. Why? Because I hosted it :)

Yes, I'd volunteered a while ago and chose to host September. It was all very exciting to start with, and then I found myself in a dilemma. What on earth was I going choose as the challenge recipe?!?! I honestly didn't think it would be so difficult to come up with something.
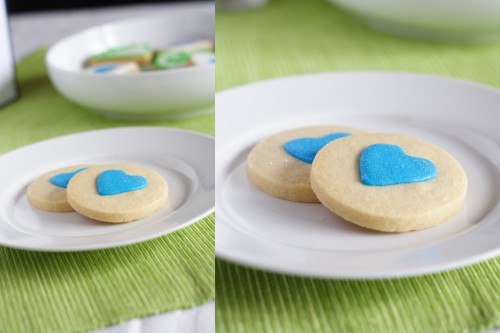
After a lot of back and forth with Lis and Ivonne, I finally settled on something that I had never done before but had long admired. Decorated Sugar Cookies, and I’m not talking random squiggles and dots, I’m talking about beautifully decorated cookies that are perfect to give as a gift or to make for party or wedding favours.

What I love about these cookies is that the sugar cookie recipe is really basic and you’d probably have all of the ingredients in your kitchen already. What makes them so impressive is that just the use of a little bit of imagination, these simple sugar cookies are made gorgeous enough to give away or to make for birthdays, bridal or baby showers, wedding favours, at Christmas or Valentines. Definitely something to keep in the file for any event you can think of.
I chose to use Peggy Porschen’s recipe for the challenge recipe. Sugar cookie recipes commonly have either baking powder or bicarb of soda, but this recipe is a little different in that it doesn’t use a raising agent which makes them great so if you’re using intricate cookie cutters, they hold their shape while baking. Perfect for decorating with royal icing!
I set a theme for the challenge, and the theme was “September”.
For me, September is my wedding anniversary. Two years this year! (HAPPY ANNIVERSARY GORGEOUS! :D )
For others, it may be back to school; the start of Spring or Autumn/Fall depending where they are in the world; September could also be someone special’s birthday or even the beginning of a favourite sporting season. Whatever was happening in the lives of the fantastic DBers, that's what I wanted the cookies to be about.
And I'm telling you, I wasn't disappointed at all. They all jumped into the challenge with lots of enthusiasm and really made some fantastic cookies.

DBers, thank you so much for taking part of this challenge, I thoroughly enjoyed hosting it and am so impressed with all of the stunning decorated cookies that were made!
(Just a note: Because decorating is quite an involved process & I was the host and want to include all of the instructions here, this post is going to be a very long one, so you might want to download the PDF file instead)
Get out your rolling pins and I hope you enjoy it!

Preparation Time
30 minutes: Making dough & rolling
1 hour min: Refrigeration
8-15 minutes: Baking per tray depending on size of cookies
Basic Sugar Cookies:
Makes Approximately 36x 10cm / 4" Cookies
200g / 7oz / ½ cup + 6 Tbsp Unsalted Butter, at room temperature
400g / 14oz / 3 cups + 3 Tbsp All Purpose / Plain Flour
200g / 7oz / 1 cup Caster Sugar / Superfine Sugar
1 Large Egg, lightly beaten
5ml / 1 tsp Vanilla Extract / Or seeds from 1 vanilla bean
Directions
• Cream together the butter, sugar and any flavourings you’re using. Beat until just becoming creamy in texture.
• Tip: Don’t over mix otherwise you’ll incorporate too much air and the cookies will spread during baking, losing their shape.
• Beat in the egg until well combined, make sure to scrape down the sides of the bowl. Add the sifted flour and mix on low until a non sticky dough forms.
• Tip: I don’t have a stand mixer so I find it easier to switch to dough hooks at this stage to avoid flour flying everywhere.
• Knead into a ball and divide into 2 or 3 pieces.
• Roll out each portion between parchment paper to a thickness of about 5mm/1/5 inch (0.2 inch)
• Refrigerate for a minimum of 30mins.
• Tip: Recipes commonly just wrap the whole ball of dough in clingwrap and then refrigerate it for an hour or overnight, but by rolling the dough between parchment, this shortens the chilling time and then it’s also been rolled out while still soft making it easier and quicker.
• Once chilled, peel off parchment and place dough on a lightly floured surface.
• Cut out shapes with cookie cutters or a sharp knife.
• Arrange shapes on parchment lined baking sheets and refrigerate for another 30mins to an hour.
• Tip: It’s very important you chill them again otherwise they’ll spread while baking.
• Re-roll scraps and follow the above process until all scraps are used up.
• Preheat oven to 180°C (160°C Fan Assisted) / 350°F / Gas Mark 4.
• Bake until golden around the edges, about 8-15mins depending on the size of the cookies.
• Tip: Bake same sized cookies together otherwise mixing smaller with larger cookies could result in some cookies being baked before others are done.
• Tip: Rotate baking sheets half way through baking if your oven bakes unevenly.
• Leave to cool on cooling racks.
• Once completely cooled, decorate as desired.
• Tip: If wrapped in tinfoil/cling wrap or kept in airtight containers in a cool place, un-decorated cookies can last up to a month.

Royal Icing:
315g – 375g / 11oz – 13oz / 2½ - 3 cups Icing / Confectioner’s / Powdered Sugar, unsifted
2 Large Egg Whites
10ml / 2 tsp Lemon Juice
5ml / 1 tsp Almond Extract, optional
Directions
• Beat egg whites with lemon juice until combined.
• Tip: It’s important that the bowls/spoons/spatulas and beaters you use are thoroughly cleaned and grease free.
• Sift the icing sugar to remove lumps and add it to the egg whites.
• Tip: I’ve listed 2 amounts of icing sugar, the lesser amount is good for a flooding consistency, and the larger amount is for outlining, but you can add even more for a much thicker consistency good for writing. If you add too much icing sugar or would like to make a thinner consistency, add very small amounts of water, a few drops at a time, until you reach the consistency you need.
• Beat on low until combined and smooth.
• Use immediately or keep in an airtight container.
• Tip: Royal Icing starts to harden as soon as it’s in contact with air so make sure to cover containers with plastic wrap while not in use.

Decorating Your Cookies: Flooding
“Flooding” a cookie is a technique used when covering a cookie with Royal Icing.
1. You outline the area you want to flood which helps create a dam
2. Then fill or flood inside the area you’ve outlined
Decorating Your Cookies: What You'll Need
- Piping bags / Parchment Cones / Ziplock Bags
- Elastic bands
- Piping tips (between sizes 1 & 5)
- Couplers
- Glasses (handy for standing your piping bags in)
- Clean clothes, dry & damp
- Toothpicks
- Gel or paste food colouring

Decorating Your Cookies: Royal Icing
The most important thing when it comes to decorating with Royal Icing is the consistency.
There are two ways of flooding your cookies. Some like to do the outline with a thicker icing and then flood with a thinner icing. Some like to use the same icing to do both which saves time and you don’t have to have two different piping bags for each colour you’re using.
The Same Consistency Method
Consistency:
• Mix your royal icing according to the recipe/instructions
• Drag a knife through the surface of the Royal Icing and count to 10
• If the surface becomes smooth between 5 & 10 seconds, the icing is at the correct consistency
• Tip: If your icing is too thick, thin it by adding a few drops of water. Mix, do the 10 second test, then if it’s still too thick, add a few more drops of water, repeat, etc.
• Tip: To thicken your icing, add small amounts of icing sugar until thick enough for the 10 second test
Two Different Consistencies Method
Consistency:
• Mix your royal icing according to the recipe/instructions.
• Separate into 2 different bowls, one lot of icing for outlining, the other for flooding.
• For the outlining icing, drag a knife through the surface of the Royal Icing.
• If the surface becomes smooth at around 10 seconds, the icing is at the correct consistency.
• Tip: If your icing is too thick, thin it by adding a few drops of water. Mix, count to 10 seconds, then if it’s still too thick, add a few more drops of water, repeat, etc.
• Tip: To thicken your icing, add small amounts of icing sugar until thick enough for the 10 second test.
• For the flooding/filling icing, drag a knife through the surface of the Royal Icing.
• If the surface becomes smooth at around 3-4 seconds, the icing is at the correct consistency.
• Tip: If your icing is too thick, thin it by adding a few drops of water. Mix, count to 3-4 seconds, then if it’s still too thick, add a few more drops of water, repeat, etc.
• Tip: To thicken your icing, add small amounts of icing sugar until thick enough for the 3-4 second test.

Colouring
• Separate Royal Icing into separate bowls for each colour you plan on using.
• Tip: Make sure to cover the bowls with cling film or a damp cloth to prevent the top from setting and then making lumps
• Using a toothpick, add gel or paste colouring to each bowl and mix thoroughly until desired colour is reached
• Tip: You can use liquid food colouring but you might not be able to get the desired strength of colour, liquid colouring will also thin out the icing so you’ll need to add more icing sugar to thicken it again.

Prepping and Filling Your Bag
• Attach your icing tips to the piping bags using couplers
• Tip: You don’t need to use a coupler but it makes it easier if you want to change tip sizes
• Tip: A size 1 tip is best for doing intricate details. A size 2 tip is good for some details and outlining. Fill or flood with sizes 2 – 5.
• Tip: You don’t need a piping bag, you can use a parchment cone or ziplock bag with a tiny bit snipped off the corner. I would however recommend getting a piping set if you don’t have one as it will be much easier and more precise.
• Stand the piping bags in glasses with the tops of the bags folded over the top of the glass.
• Fill your icing bags with each coloured icing.
• Tie the ends of the piping bags with elastic bands.

Decorating: Outlining
• Fit the piping bag with a size 2 or 3 tip.
• Tip: Or snip a very small bit of the corner off of a parchment cone or Ziploc bag
• Hold the piping bag at a 45 degree angle above the cookie where you want to start the outline.
• Gently squeeze the piping bag and start moving in the direction you want to outline the cookie.
• Start lifting the piping bag away from the cookie so that the flow of icing falls onto the cookie, making it an even and neater outline.
• As you start to reach the beginning of the outline, bring the piping tip closer to the surface of the cookie to meet the start of the icing outline.
• Tip: If you’re doing an intricate cookie, like a snow flake, you won’t be able to lift the tip as far away from the cookie.
• If you’re doing a different colour border, eg a black border, let the outline dry before flooding. If using the same colour for the outline as you’re flooding with, begin flooding after doing the outline.
Decorating: Flooding
• Fit the piping bag with a size 2-5 tip, the bigger the area being filled, the bigger the tip.
• Tip: Or cut slightly more off the corner of a Ziploc bag to create a slightly larger opening.
• Quickly zigzag back and forth over the area you want to fill.
• Tip: You need to be quick when flooding the cookie so don’t worry too much if it’s not filled in neatly.
• Using a toothpick or clean paintbrush, push the icing around into the gaps that are still remaining.
• Either pick up the cookie and tip it from side to side to even out the filling, or lightly bang the cookie down on your kitchen counter.

Decorating: Melding Colours
• If you would like to add lines or dots to the base colour that you flooded the cookie with so that they meld and dry as a smooth surface, you need to add the lines/dots/patterns as quickly as possible after flooding and smoothing the surface of the cookie.
• Tip: Make sure to have all the colours you’re planning on using ready and close by so that you can switch between colours quickly
• Simply pipe other colours onto the flooded surface in patterns or lines which you can either leave as that or then drag a toothpick through to make marbling patterns.

Decorating: On top of flooding
• If you’d like to do other patterns/outlines or writing on top of the flooded surface so that they are raised above the flooded background, simply allow the icing to dry, preferably over night.
• Fit the piping bag with tip sizes 1-3.
• Pipe patterns or write on top of the dry icing
• Tip: For writing, the consistency of your icing should be thicker rather than thinner, drag a knife through your icing and when the surface smoothes around 12-15 seconds, the consistency is correct.
Packaging and Storing
• Once fully decorated, allow cookies to dry for 24 hours in a cool and dry area.
• Stack cookies in an airtight container, from largest cookies at the bottom, to smallest and more intricate at the top, with parchment or wax free paper in between the layers.
• Store in a cool and dry area with the container’s lid firmly sealed.
• Will last for about a month if stored this way.

General Baking Tips
• When measuring by volume (cup) always shift/aerate your flour/icing sugar in the container/bag before measuring because it settles as it sits and so you end up with more flour/icing sugar in your cup. I do this by moving the ingredient around with a spoon, whisk or fork.
• When measuring flour or icing sugar by volume (cup) never scoop the flour/icing sugar up with the cup otherwise you compress the contents and this can make a big difference in the amount you’re using. Rather, spoon the ingredient into the cup until level with the top.
• When measuring baking powder or baking soda, always level off the top of the measuring spoon with something flat (like the back of a knife) as these ingredients need to be accurately measured.
• When mixing your ingredients, always follow the recipe instructions, especially when it comes to beating in eggs and flour, so if it specifies to mix until just combined or to beat for 4 minutes, follow the instructions to get best results.
• Unless otherwise specified, always have your ingredients at room temperature.
• It’s always best to invest in an oven thermometer so that you know exactly the temperature you’re baking at then you can also find out if you have cold or hot spots in your oven.
• If you need to rotate your trays midst baking, always allow at least half the baking time to lapse before opening your oven to move baking trays around, this allows time for your baked goods to form a good structure so that they won’t flop.
General Royal Icing Tips
• Keep a damp cloth handy while decorating your cookies so that if you’re switching between different icing bags, you can keep the tips covered with the damp cloth so that the icing doesn’t dry and clog them.
• If your icing tips do clog, use a toothpick or pin to unclog them.
• Always pipe a little bit of royal icing onto a board/paper towel before you begin to make sure there are no air bubbles.
• Remember to always cover bowls containing royal icing wither cling wrap, a damp cloth or sealable lid so that the surface doesn’t dry.
• Don’t store anything decorated with royal icing in the fridge otherwise the royal icing will become tacky.
I also want to mention the one site that I referenced the most when putting this challenge together. Not only is she absolutely incredible with decorating cookies, she's also put together really fantastic tutorials. I really do recommend visiting Sweetopia!