
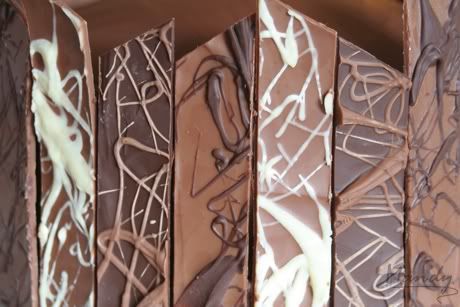
There's something about a cake that's decorated with chocolate shards, it makes it look so much more decadent and all you can think about is having a slice of the cake and picking off the shards to eat them!
I'll be honest, making and decorating with chocolate shards isn't exactly a 10 minute job, it does take a little bit of time and patience, but it's actually quite easy. It's worth the time making them because the end result is something special. Each time I've decorated with them, I've been asked where I bought the cake from!
If you have a busy schedule and only have bits and peices of time available to bake, these can be made ahead of time and stored until you need them. You can get creative with the patterns, textures, flavours or even colours, chocolate is versatile enough to have a lot of fun with.
Using a piping bag and a small writing nozzle, you can pipe hearts or stars or even the birthday person's age in a lighter or darker chocolate depending on the colour of the shard. Have fun with white chocolate by adding different colours. You can also use chocolate with crunchy peices in it like caramel crunch, the texture of the shard will be interestingly lumpy and bumpy but will come with the extra flavour, using a slab of mint crisp is especially delicious.
So make a cake a little bit more special and enjoy the compliments!
What You Need:
(The following list is what I used for the shards in the photos on this page)
8 Milk Chocolate Shards with Dark Chocolate drizzle:
- 80g Milk Chocolate
- 20g Dark Chocolate
8 Milk Chocolate Shards with White Chocolate drizzle:
- 80g Milk Chocolate
- 20g White Chocolate
8 Dark Chocolate Shards with Milk Chocolate drizzle:
- 80g Dark Chocolate
- 20g Milk Chocolate
Preparation:
(The following is a guideline for a 3 layer 8" cake)
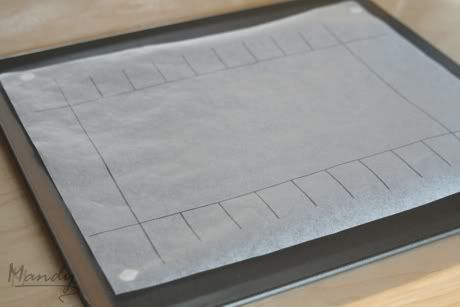
- Cut 3 pieces of parchment paper to go onto 3 baking sheets or trays
- Using a marker pen, draw a 21cm x 14cm rectangle on each parchment sheet
- Mark lines at every 2.6cm (these will be the individual shards)
- Flip the parchment paper over so that the pen markings are on the back
- Tape or stick the parchment down to the baking sheet
- Tip: Draw one of the rectangles to be 22cm x 14cm, mark 7 shards to be 2.6cm but have the 8th shard wider than the others, put this wider shard on the cake last, you can trim its width to fit snuggly into the last gap
Making the shards:
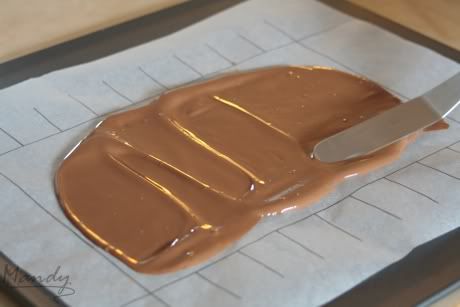
- Melt (and temper*) 80g milk chocolate in a double boiler
- Pour the milk chocolate onto the wax paper, spread the chocolate evenly, go over the border of the rectangle slightly so that the edges can be trimmed neatly
- Allow to set for 10-15 mins
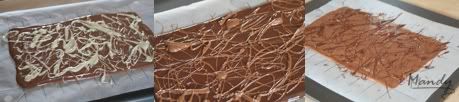
- In a seperate bowl, melt (and temper*) the 20g white chocolate
- Using a teaspoon, flick the melted white chocolate over the milk chocolate (or pipe designs etc)
- Repeat the above to make the Milk Chocolate with Dark Choc & Dark Chocolate with Milk Choc shards
- For smooth shards, drizzle the "pattern" chocolate onto the parchment first
- Allow to cool till set
- Pour the "filler" chocolate over the drizzled chocolate and spread it out with a spatula or palette knife
Cutting:
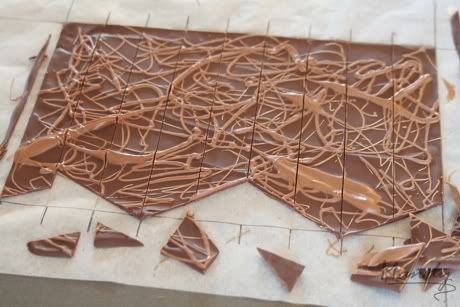
- Allow to cool until firm enough to cut but not so hard they'll crack, the chocolate should not be sticky to the touch
- Using a sharp knife, trim 3 sides of the rectangle (2 widths & 1 length)
- On the untrimmed length, cut the chocolate at angles to make sharp points to the shards
- Allow the chocolate to set until completely hard
- To loosen the chocolate from the paper, carefully slide a sharp knife under each shard and set aside
- If you're making smooth shards, when you flip the shard over you'll see the pattern on the side that was stuck to the parchment paper
Decorate!
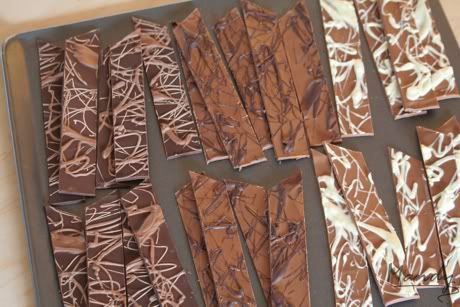
- Before sticking the shards onto the cake, you can trim the ends of the shards to make different lengths
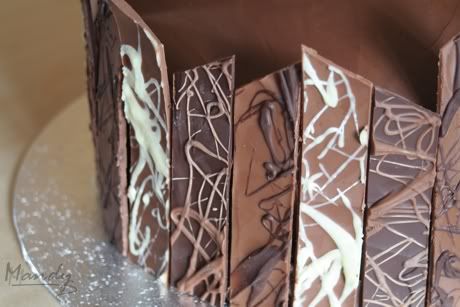
- Carefully press each shard into the icing, pattern side facing out, alternating between the differently patterned shards and different heights, working your way around the cake until you have the last (wider) shard left. Trim the width of the last shard carefully to fit into the gap
- Tip: Obviously chocolate melts with heat so try not to handle the shards too much ;)
If you're worried about breaking some shards in the process, melt a little extra chocolate and make a few extra shards
* For best results you should temper the chocolate so that the chocolate doesn't bloom (get splotchy white marks on it) and so that it has a good snap and mouth feel, here's a great guide:
Remember, always try use the best chocolate possible, when going to effort like this you want it to taste as great as possible
The measurements I've provided are guidelines only, I use them when I make Devil's Food Cake and I generally cover the cake with the ganache the same way each time, so your cake might have more or less frosting around it. I'd suggest that once your cake is iced, measure the circumference, decide how many shards you want to make and go from there (& save your measurements so you can use them again!)