
The "perfect gift" bouquet
I'm sure you've seen cupcake bouquets of all sorts pinned on Pinterest or on other food blogs. They're cute and eye-catching, and best of all, EDIBLE and TASTY!
So long as you have a bit of confidence handling a fully loaded piping bag, these are really easy to make.
The assembly doesn't take too long either, so if you want to impress your guests with an edible centerpiece, this is only a few extra minutes in preparation and well worth it.

The "lollipop" bouquet
I've done a how-to video on two kinds of cupcake bouquets. The first is what I like to call the "lollipop" bouquet. It's a 12 cupcake bouquet that is full and round. You could make it bigger if you like, you'll just need more cupcakes and a bigger foam ball and vase.
The thing about the lollipop bouquet is that it's not something you could (easily) transport. You've got cupcakes hanging off the sides sporting their swirls of frosting, and there's just no way that I can see you could move this in a car without covering the apholstery with smears of sweetness.
That's not to say you can't ever have a lollipop bouquet anywhere other than home. All you'd need to do is assemble your bouquet whereever it is you want to enjoy it. Like I said, assembly isn't all that complicated so you'd only need to arrive wherever you're going about 30 minutes earlier. (I would, however, recommend taking extra unfrosted cupcakes and more frosting than you think you'll need, just to be on the safe side!)

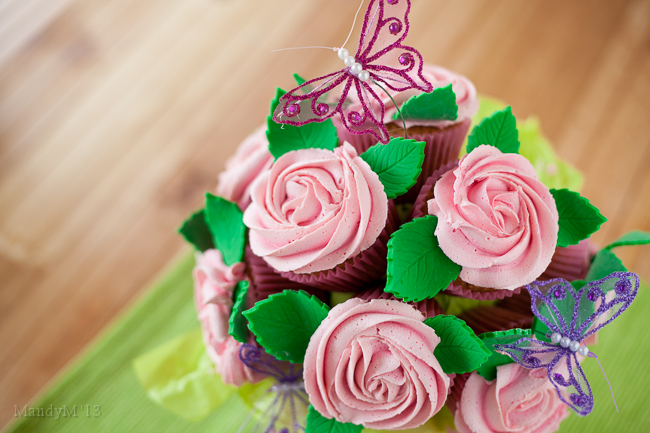
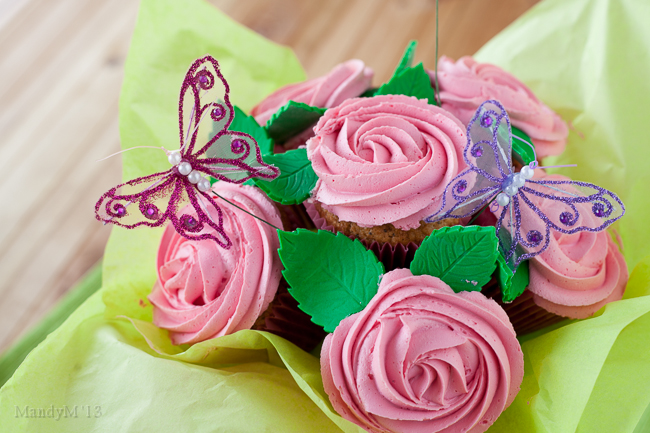
The "perfect gift" bouquet
I've called the second bouquet the "perfect gift", well, because it is!
A pot or vase with only 6 cupcakes, which is far more manageable to carry and transport, is the perfect "Yay! New baby!" "Welcome to the neighbourhood" "Be my Valentine" or "Just because" gift.

Cupcake bouquets are best made with a more dense cupcake. Remember, these gorgeous things are going to be hanging off the side of your bouquet, almost defying gravity, so they need to be sturdy enough to support their weight as well as their swirls of frosting.
Also, use cupcakes made the day before, they'll be a little more firm.
As for the frosting, I'd recommend any firm buttercream. I used simple buttercream, but only because I didn't have enough eggs to make my favourite Swiss Buttercream.
On the lollipop bouquet, I would stay away from using cream cheese frosting. It's been my experience that it's just never firm enough and too easily affected by heat for me to use confidently for something like this. However, I think it would be fine for the six cupcake perfect gift bouquet.
I hope you like the video and happy bouquet baking!
Things You'll Need
12 Cupcake Lollipop Bouquet
- Green gumpaste or rolled fondant
- Leaf cutters
- Small rolling pin
- Cornflour or powdered sugar, for rolling
- 12 Unfrosted Cupcakes
- Firm Buttercream (enough for 12 cupcakes) tinted with gel or paste colour
- Piping bag fitted with a large closed star nozzle (Wilton 2D, Kaiser 45-9 16mm, LVCC 2C)
- 10cm / 4" Florist foam ball, wrapped in clingfilm and green tissue paper
- Green tissue paper
- Vase or pot
- Trimmed skewers or toothpicks
- Ribbon
- Bubble wrap (if you need to stuff the bottom of your pot or vase and add padding around the foam ball to make it fit snuggly)
6 Cupcake Perfect Gift Bouquet
- Green gumpaste or rolled fondant
- Leaf cutters
- Small rolling pin
- Cornflour or powdered sugar, for rolling
- 6 Unfrosted Cupcakes
- Firm Buttercream (enough for 6 cupcakes) tinted with gel or paste colour
- Piping bag fitted with a large closed star nozzle (Wilton 2D, Kaiser 45-9 16mm, LVCC 2C)
- 10cm / 4" Florist foam ball, wrapped in clingfilm and green tissue paper
- Green tissue paper
- Vase or pot
- Trimmed skewers or toothpicks
- Ribbon
- Bubble wrap (if you need to stuff the bottom of your pot or vase and add padding around the foam ball to make it fit snuggly)
How To