
The big three oh. Now that deserves something extra special!
Something rich, decadent and gorgeous. Something like a chocolate mousse cake which has a chewy, chocolatey dense brownie base. With a gorgeous and airy but oh so rich chocolate mousse middle. With a light and fluffy chocolate sponge on top finished with a ganache glaze. The whole cake hugged by chocolate and decorated with chocolate truffles and white chocolate roses. Something like the cake I made for my friend's 30th birthday.
What can I say, she loves chocolate!

White chocolate roses for decoration

Milk chocolate cigarillos
I think this is the most elaborate and decadent cake that I've made to date and I enjoyed every second of it! From the beginning of the process months ahead of ordering the chocolate cigarillos and white chocolate roses, to baking, making and assembling. And of course, the eating!
Yes, I really did order the decorations months ahead. I get excited and just can't wait to start getting all the bits and pieces that I need!
(See notes at the end of this post under "Other Tips" for extra info about the white chocolate roses)


Rich chocolate mousse layer on top of a chewy and decadent brownie base
The research into recipes also started months ahead of time. I was set on having a real chocolate mousse centre. Well, I shouldn't use the word "real" 'cause there are different types of mousse and each is a mousse, I shouldn't be labelling one of them as "real" when they all count!
Rather, I wanted to make a rich chocolate mousse with egg yolks, beaten egg whites and whipped cream. That kind of mousse as opposed to the gelatine set or just whipped cream mousse. I wanted the specific richness and texture of the egg yolk mousse.

Luscious chocolate mousse threatening to ooze out from in between the brownie and sponge layers but hanging in there!
Most of the chocolate mousse cake recipes that I found had the other kinds of mousse as a middle layer (set with gelatine or only relying on whipped cream) but I eventually found a recipe that was exactly what I was looking for which got me very excited. It meant that it could be done. See, I was a little worried that the type of mousse I wanted to use wouldn't be able to hold up under the weight of another layer on top of it 'cause it's normally something served in a bowl and doesn't need to have any structural strength to it. When I saw that it could hold up a layer I was one happy baker. I love getting my way!
The brownie base and chocolate sponge was an easy recipe search and so I was set for some birthday cake baking!
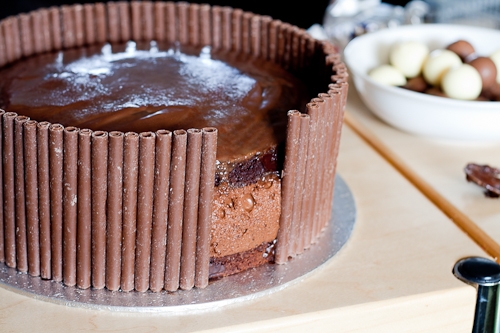
Putting on the cigarillos for an impressive finish to the cake
This cake is definitely not something you can rush through. You need to set aside time for the baking and setting and assembling. Preferably over two days.
The way I planned it out worked quite well, although I did actually rush towards the end of assembly which is my own fault for not starting on it early enough on the day 'cause we were due to our friend's place for her b'day lunch. If it had been a b'day dinner I would have been fine, but me not being able to get my butt out of bed early on a Saturday did 'cause me a little bit of stress.

I did get it all done before we were meant to head out the door, but only just barely, which is not the way I enjoy doing things. Baking shouldn't be a mad rush and scramble, it should be enjoyed and you should have plenty of time so that there's no stress. Also makes for less mistakes.
Anyway, the time pressure that I put myself under was completely forgotten when the birthday girl saw her cake and was thrilled with it, and then when we all sat down to have huge slices with our coffee. It was sinfully delicious!
I'll say this, it could feed a fair crowd 'cause it really is very rich, as you can imagine with all of that chocolate. We ended up taking two slices home with us and ended up making those into four slices 'cause that was more than enough for one sitting!
For the chocolate lover out there, you really do need to have this cake!

Chocolate Mousse Cake
Serves up to 23 if you have 1 truffle per slice
Recommended to make over two days
Day 1:
- Spray or paint chocolate roses with colour
- Bake brownie base
- Once brownie has cooled, prepare chocolate mousse
- Pour chocolate mousse over brownie base in mould (acetate sheets, parchment paper or springform tin)
- Refrigerate overnight to set
- *Bake sponge layer
Day 2:
- *Bake sponge layer
- Prepare ganache glaze
- Once sponge layer is completely cooled place on top of chocolate mousse layer
- Glaze the top with ganache
- Chill in fridge till ganache is set
- Remove mould
- Stick cigarillos to perimeter of cake and decorate as desired
* You can bake the sponge layer on day 1 and leave final assembly to the second day, I just opted to make it on the day so that it was as fresh as possible. If baking the sponge layer the day before, make sure to wrap it well in plastic wrap to keep it fresh overnight.
Brownie Base
Ingredients
1/2 cup All Purpose Flour
85g (70%-85% cocoa content) Good Quality Dark Chocolate, chopped
90g Unsalted butter, cut into small blocks
1 (heaped) cup Granulated Sugar
2 Eggs
1/2 tsp Baking Powder
2 tsp Vanilla Extract
1/4 tsp Salt
Brownie Base Method:
- Line the bottom of a 9" springform pan with parchment paper and butter the sides
- Pre-heat oven to 160°C (140°C Fan Assisted)
- In a bowl combine the flour baking powder and salt
- Melt the chocolate and butter in a large double boiler or heatproof bowl set over a pot of simmering water, stir occasionally until smooth
- When the chocolate mixture is completely melted and smooth, remove the bowl from the pot and slowly whisk in the sugar
- Add the eggs one at a time, whisking after each addition until thoroughly combined
- Stir in the vanilla
- Add the flour mixture in two additions, folding with a rubber spatula until just combined
- Pour into the prepared pan and smooth the top with a spatula
- Bake for 25-30mins until a toothpick comes out clean
- Cool completely in the pan on a cooling rack
- Use in assembly of cake
Chocolate Mousse
Ingredients
285g (70% cocoa content) Good Quality Dark Chocolate, chopped
1 cup Heavy/Whipping Cream (36% - 40% butterfat)
5 Eggs, separated
75g Unsalted Butter
60g Granulated Sugar
2 Tbsp Coffee Liqueur (or 2 Tbsp strong coffee)
1 tsp Vanilla Extract
1/8 tsp Cream of Tartar
Pinch of Salt
Chocolate Mousse Method:
- Melt the chocolate and butter in a double boiler or in a heatproof bowl over simmering water, stir occasionally until smooth
- Once melted and smooth, remove from heat and allow to cool slightly, 5-10mins
- In a separate bowl beat together the egg yolks with the liqueur/coffee and vanilla
- Pour into the chocolate mixture and whisk to combine.
- Tip: At this point it may look like a seized mess but it will come together at the end!
- Refrigerate while you do the next steps
- In a clean bowl, whisk the egg whites with cream of tartar until it begins to get foamy
- Gradually pour in the sugar and beat till medium peaks form, set aside
- Whip the cream until medium peaks form, set aside
- Remove the chocolate mixture from the fridge and stir in a few tablespoons of the beaten egg whites to loosen the mixture
- Fold in the rest of the egg whites
- Tip: Be gentle but thorough, you don't want to deflate the egg whites but you don't want to see too many white streaks in the mixture
- Carefully fold in the whipped cream until no white streaks remain
- Use in assembly of cake
Chocolate Sponge
Ingredients
30g (70% cocoa content) Good Quality Dark Chocolate, finely chopped
1/2 cup Strong Coffee, hot
1 cup Granulated Sugar
100g (2/3 cup + 2 1/2 Tbsp) All Purpose Flour
60g (1/2 cup) Cocoa
1/4 tsp Baking Powder
2/3 tsp Baking Soda
1 Egg
1/4 cup Sunflower/Canola Oil
1/2 cup Buttermilk
1/4 tsp Vanilla Extract
Chocolate Sponge Method:
- Preheat oven to 150°C (130°C Fan Assisted)
- Line bottom of a 9" pan with parchment paper and grease the sides of tin
- Combine hot coffee with finely chopped chocolate in a bowl
- Stir occasionally until chocolate is melted and mixture is smooth
- Sift together sugar, flour, cocoa powder, baking soda, baking powder, and salt in a large bowl
- In another large bowl with an electric mixer beat eggs until slightly thickened and pale, about 3-5 minutes
- Slowly add oil, buttermilk, vanilla and melted chocolate mixture into the eggs, beating until combined well
- Add dry ingredients and beat on medium speed until just combined
- Pour batter into prepared pan and bake until a toothpick comes out clean, about 45mins to 1hour
- Cool layer completely in pans on cooling racks
- Carefully run a knife around edges of pans and invert sponge onto a rack and remove the parchment paper
- Once completely cool, use in assembly
Ganache Glaze
Ingredients
100g Good Quality Milk or Dark Chocolate
100ml Double Cream
30g Unsalted Butter
Ganache Method:
- Finely chop the chocolate and place in a heatproof bowl
- Heat cream on stove until just about to boil
- Tip: It will start bubbling around the edges of the pot
- Remove pot from heat and pour over the chocolate, stirring until combined and the chocolate has melted
- Add the butter and stir until butter has melted and the ganache is thoroughly mixed
- Allow to cool and thicken slightly so that it's still pourable but not too liquid
- Tip: Speed this up by chilling in the fridge. Make sure to stir it occasionally so that in cools evenly

Lindor truffles to decorate
To Decorate
+/- 460g Chocolate Cigarillos
* White Chocolate Roses
Edible colour mist/spray or paint
Various Truffles
Ribbon
30g-50g Chocolate for glueing cigarillos, roses and ribbon
* See notes in "Other Tips" at the end of this post on where to buy or how to make them yourself
Cake Assembly
- Spray or paint your white chocolate roses
- Tip: It's best to build up the colour by doing a light spray, leaving to dry, adding another coat, leaving to dry, etc as I found that going crazy with the colour in one spray ended up with the paint going blotchy
- Tip: You can colour your roses far ahead of time, I did mine a week before and kept them stored in an airtight container in a cool place
- Bake the brownie base
- Once completely cooled, remove from springform pan/baking tin and set into your cake board/plate
- Using parchment paper or acetate sheets, form a ring around the brownie base. Have the sheets overlap then tape to secure it. This will be your food mould which the mousse will set in on top of the brownie
- Tip: you could also use the outside ring of your springform pan to make the mould, simply place over the brownie and straight onto the cake board/plate then clip closed
- Prepare the chocolate mousse
- Pour over the brownie base in the mould and smooth the top with the back of a spoon or spatula
- Refrigerate overnight to set
- Bake the top sponge layer
- Prepare the ganache glaze
- Carefully place the chocolate sponge onto the chocolate mousse
- Pour enough ganache to cover the chocolate sponge, spread with a spatula if needed
- Refrigerate until ganache is set
- Once set, remove the acetate/parchment/sprinform mould from the cake
- Melt a small amount of chocolate
- Using a small paintbrush, brush a bit of melted chocolate onto the sponge and brownie layer then stick the cigarillos onto the side of the cake using the melted chocolate as glue
- Tip: Work a little bit at a time so that the chocolate doesn't set before you have a chance to stick the cigarillo to it
- Once all the cigarillos are attached, carefully tie your ribbon around the cake
- Tip: I chose to have 2 ribbons. The bottom one I simply glued the ends together with a bit of melted chocolate, the other I tied a ribbon on the "front" of the cake
- Using your melted chocolate and paintbrush, put a little bit of chocolate onto the bottom of the white chocolate roses then arrange and stick them onto the cake
- Decorate with chocolate truffles
- Refrigerate until ready to serve!

Chocolate sponge recipe adapted from Smitten Kitchen
Chocolate mousse recipe adapted from Evil Shenanigans
Brownie recipe adapted from Annie's Eats
Other Tips:
Keep chilled in the fridge
Best eaten on the day of final assembly but we still had slices 2 days later and it was still fresh, but make sure to store any leftovers in an airtight container in the fridge otherwise the top sponge layer will dry out
If you're wondering where I got the cigarillos and white chocolate roses from, you can order them at Squires Kitchen. I used milk chocolate cigarillos and the 40mm & 50mm roses
I've had a few e-mails about the white chocolate roses, as I've mentioned, I bought them online from Squires Kitchen, but if you're not able to find somewhere to order them from, you can make them yourself if you're familiar with sugarcraft flowers. You'd make them as you would sugar paste/sugar florist paste roses, but you use modelling chocolate instead. You can also make your own modelling chocolate if you can' t buy it. It's simply two ingredients, chocolate and glucose or corn syrup. Here are the recipes to make your own various modelling chocolate from The Joy of Baking
I used Wilton's orange Color Mist Spray to colour the white chocolate roses
While in between steps of assembly, keep the cake refrigerated so that the mousse keeps firm
The chocolate mousse does contain raw eggs so be sure to use fresh eggs
I would suggest that once the cigarillos are on the cake, use a clean and dry paint brush to brush off any chocolate dust. I ran out of time so didn't do this and you can see the cigarillos are a little speckly and messy