
For those who prefer the more traditional Christmas.
In red, green and white, orange, lemon and almond flavoured poured fondant covering rich fruit cake sandwiched with a layer of marzipan. Also topped with cute bows and gift labels brushed with edible glitter for a little added sparkle.
Click on the link below to see the rest of the recipe and assembly instructions.

A neat little trick that I learnt from a recipe pamphlet I got from one of my favourite kitchen supply stores is to make a slight depression in the middle of the batter before baking so that your fruitcake rises to a flat surface so you don't need to trim the top off.

Another tip is to cover the top of the tin with foil or greaseproof paper while baking so that it doesn't burn while it spends the 4 odd hours it needs to make this gorgeous, dense, fruity, nut filled cake.

Fruitcake keeps really well so these will make great gifts for your neighbours, friends or family. And colour them any way you want, trendy or traditional!

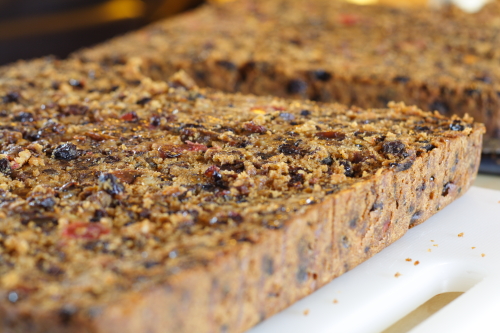
Rich Fruit Cake
Ingredients
675g Currants
450g Sultanas
225g Raisins
175g Glacé Cherries, halved and soaked in 4Tbsp Brandy overnight
175g Chopped Almonds
150g Mixed Peel
450g (4 cups) Plain Flour
115g (1 1/3 cups) Ground Almonds
375g Unsalted Butter or Margarine, at room temperature
400g (2 cups) Soft Brown Sugar
2 Tbsp Molasses or Black Treacle
8 Eggs
Zest from 1 lemon
Zest from 1 Orange
2 tsp Mixed Spice
1 tsp Ground Nutmeg
Method
- Line a 10" square cake tin with 2 layers of parchment paper
- Preheat oven to 140°C (120°C Fan Assisted)
- Cream the butter and sugar
- Beat in eggs, 2 at a time, scraping down the sides of the bowl and beating well after each addition
- Add the flour, ground almonds and spices and mix until just combined
- Stir in the fruit, nuts, cherries with brandy, treacle/molasses and citrus rinds
- Pour into prepared cake tin
- Spread evenly and make a slight depression in the centre so that the cake rises to a flat surface
- Cover the top with greaseproof paper or foil so that it doesn't brown too quickly
- Bake for 4 - 4 1/2 hours, check by inserting a wooden skewer or toothpick into the centre, it's ready when it comes out with no uncooked mixture stuck to it
- Cool on a wire rack in the cake tin
- When completely cool, turn out from the tin
- Tip: It's best to leave it overnight, wrapped in clingfilm and parchment paper still on, so that the flavours develop
- Follow assembly instructions below

Pouring Fondant
Ingredients (Makes 2 1/2 cups, enough for 6 - 8 small cakes depending on consistency and how thick you want the fondant covering)
6 cups Pure Icing Sugar
1/2 cup Water
2 Tbsp Glucose Syrup or Light Corn Syrup
1 tsp Flavoured Extract (Lemon, Almond and Orange)
Gel food colourings (Green and Red)
Method
- Sift the icing sugar into a pot
- Add glucose syrup/light corn syrup and water
- Stir to combine
- Heat on low, don't exceed 40°C
- Remove from heat and stir in chosen flavour and colour
- Tip: Add slightly more water if it's too thick
- Tip: I find that this fondant sets very quickly so work quickly with it and return to low heat to help keep it more liquid
- Tip: This recipe is easily doubled or tripled

Assembly
10" Square Fruitcake
500g Marzipan
1/3 cup Smooth Apricot Jam, boiled then left to cool
Fondant
Sugarpaste Decorations
- Level the top of the cake if it needs it
- Tip: Use a sharp serrated bread knife, wire cake leveler or unflavoured dental floss
- Tip: When using a wire cake leveler to remove the uneven top, set the wire at the desired height and saw back and forth across the cake, use the same swing motion when using unflavoured dental floss
- Cut the cake horizontally to divide it into two layers
- Tip: Use a bread knife, wire cake cutter or unflavoured dental floss
- Carefully move the top layer to one side
- Roll out the marzipan to a thickness of about 5mm
- Brush both layers with apricot jam
- Lay marzipan on one of the layers
- Carefully place the second layer on marzipan and press down gently
- Trim off excess marzipan
- Carefully flip the whole cake upside down so that the smooth and flat surface from the bottom of the cake is now on top
- Using the tip of your knife, mark the top of the sponge where you intend to cut with 4 lines
- Turn the cake 90 to the right and mark the top again with 4 lines
- Cut along the one set of lines, turn the cake 90 to the right and cut along the other lines so that you have 25 small squares
- Tip: Neaten up each square by trimming them with a serrated blade, keep the offcuts to make little balls for bitesized treats
- Put cooling racks on greaseproof paper or trays
- Prepare the fondant (according to instructions if using a mix, or according to recipe), one batch with orange flavour, one with lemon and one with almond in red, green and white (or other flavours and colours of your choice)
- Arrange the cakes on the cooling racks
- Pour the fondant over each cake, touching up bare spots with a spatula
- Leave to set for about 30mins before doing the royal icing detail
- Prepare the royal icing (according to instructions if using a mix, or according to recipe)
- Fill a piping bag with the royal icing and attach a plain round or flat tip
- Pipe a cross over the top of the cakes and optionally a vertical line on each side to make the "ribbon" on the gift
- While the royal icing is still wet, stick your sugarpaste ribbons, labels or other chosen decorations on top of each cake
- Leave to set

Rolling out the marzipan
Rich Fruitcake recipe adapted from Irresistable Cakes
Poured Fondant recipe adapted from Wilton
Other Tips
If you don't like marzipan, sandwich the fruit cake with brandy or cinnamon Swiss buttercream or a generous layer of apricot jam
Fruitcake keeps very well so if you're making your own, you can bake it weeks ahead of time and keep it well wrapped in greaseproof paper and clingfilm
For a smoother look, do a crumb coating with buttercream or apricot glaze